
- All
- Product Name
- Product Keyword
- Product Model
- Product Summary
- Product Description
- Multi Field Search
English
Views: 268 Author: Young Mei Publish Time: 11-08-2026 Origin: Site


Content Menu
● What Makes French Tips Look Balanced on Oval Nails?
● Choose Your French Manicure Method
● Tools for DIY French Tip Nails on Oval Nails
● How to Do French Tip Nails on Oval Nails Step by Step
>> Step 1: Shape a Smooth, Centered Oval
>> Step 2: Prepare Without Injuring the Surrounding Skin
>> Step 3: Apply the Base Layers
>> Step 4: Plan the Smile Line
>> Step 5: Paint the Curve in Small Sections
>> Step 6: Correct Before Adding More Product
● How to Adjust French Tips for Different Oval Nail Lengths
>> Short Oval Nails: Keep the Tip Visually Light
>> Medium Oval Nails: Balance Width and Curve
>> Long Oval Nails: Check the Side View Too
● Common French Tip Mistakes and How to Fix Them
● When French Nail Stickers or Press-Ons Make More Sense
● A Manufacturer's Perspective: Developing Better Oval French Nails
>> Specify Proportions Across Every Size
>> Review Fit, Finish, and Instructions Together
● Keep Nail Health Part of the Routine
● Create Your Next Oval French Nail Collection
>> Can You Do French Tips on Very Short Oval Nails?
>> What Is the Easiest French Tip Method for Beginners?
>> Should Every French Tip Be the Same Width?
>> Can French Tip Stickers Be Used With Gel Polish?
>> How Long Will Oval French Tip Nails Last?
>> Why Does My French Manicure Look Uneven?
Learning how to do French tip nails on oval nails starts with one important detail: the white tip should complement the rounded shape, not fight against it. A balanced smile line, a suitable base shade, and thin layers can make a simple French manicure look polished without complicated nail art.
The challenge is keeping that balance across ten nails. A tip that looks elegant on a long thumbnail may appear heavy on a shorter little finger.
This guide explains how to shape oval nails, paint cleaner French tips, correct common mistakes, and choose between polish, nail stickers, and ready-made press-ons. It also explores what brands should consider when developing an oval French nail collection.

The smile line is the curved boundary between the base color and the tip. On oval nails, its shape strongly influences the finished appearance.
A very straight line can visually flatten the rounded edge. An excessively deep curve can make a short nail look crowded.
My recommendation is to begin with a shallow, rounded smile line and adjust it to the nail's proportions. Treat this as a design starting point, not a fixed rule.
Look for three things:
- A curve that appears centered on the nail.
- Side points that look balanced from left to right.
- A white band that leaves enough visible base color.
Matching the visual proportions matters more than making every white tip exactly the same width.
Before collecting tools, decide how you want to create the look.
| Method | Best suited to | Main consideration |
|---|---|---|
| Regular nail polish | Beginners who prefer an air-drying manicure | Layers need sufficient drying time |
| Gel polish | Users familiar with a compatible curing system | Skin contact and curing instructions require particular care |
| French tip guides or stickers | Users who want help defining the curve | Application depends on the specific product |
| Finished oval press-on nails | Users who prefer a predesigned result | Correct sizing and application are essential |
For a first attempt, regular polish offers a straightforward way to practice brush control without a curing lamp.
Finished press-ons remove the need to paint the smile line yourself. However, they still require careful fitting, preparation, and removal.
Prepare your workspace before opening any polish.
You will need:
- A fine-grit nail file suitable for natural nails.
- A base coat.
- A sheer pink, beige, or other preferred base shade.
- White or colored tip polish.
- A fine liner brush.
- A small cleanup brush.
- A compatible remover.
- A top coat.
- Lint-free wipes.
Optional tools include French tip guides and a practice tip holder.
For gel products, use the lamp and application system specified by the manufacturer. Do not assume every gel works with every lamp.
Work in a ventilated space, protect your table, and keep products away from children.
Start with clean nails and remove existing polish using the appropriate method.
Gently refine the free edge into a rounded oval. Keep the sidewalls balanced rather than filing them aggressively inward.
Check each nail from above and from the fingertip. An uneven outline can make a correctly painted French tip look crooked.
If your nails are very short, follow their natural rounded edge instead of forcing an elongated oval.
Avoid excessive surface buffing. The aim is a neat shape, not a thinner nail plate.
Remove filing dust and follow your chosen product's preparation instructions.
Leave the cuticles intact. Cutting or aggressively pushing them back can injure the protective barrier around the nail.
Do not apply polish, gel, or adhesive over broken or irritated skin. If a nail is painful, discolored, lifting, or otherwise unhealthy, pause the manicure rather than covering the problem.
Apply a thin base coat and let it dry, or cure it as directed.
Next, add your chosen base shade in thin layers.
A sheer pink creates a traditional appearance. A beige or peach-toned base offers a different finish, while a more opaque shade can conceal an uneven natural free edge.
Choose the color you prefer against your own skin rather than relying on one universal "nude."
Leave a small, clean margin around the skin.
Before painting, compare the available nail length.
For short oval French tip nails, start with a narrow band. Longer nails offer more space for a wider tip.
Mentally mark three points:
1. Where the curve will sit near the left side.
2. Where it will sit near the right side.
3. Where the curved boundary will pass through the center.
These reference points help prevent one side from dropping lower than the other.
Load a small amount of white polish onto your liner brush.
Connect one side point toward the center with a short, controlled stroke. Repeat from the opposite side, then refine the meeting point.
Fill the area between the smile line and the free edge with a thin layer.
Resting your working hand on the table can make movement easier to control. Rotate the finger slightly when needed instead of twisting your wrist into an awkward angle.
With regular polish, avoid repeatedly brushing an area that has started to dry.
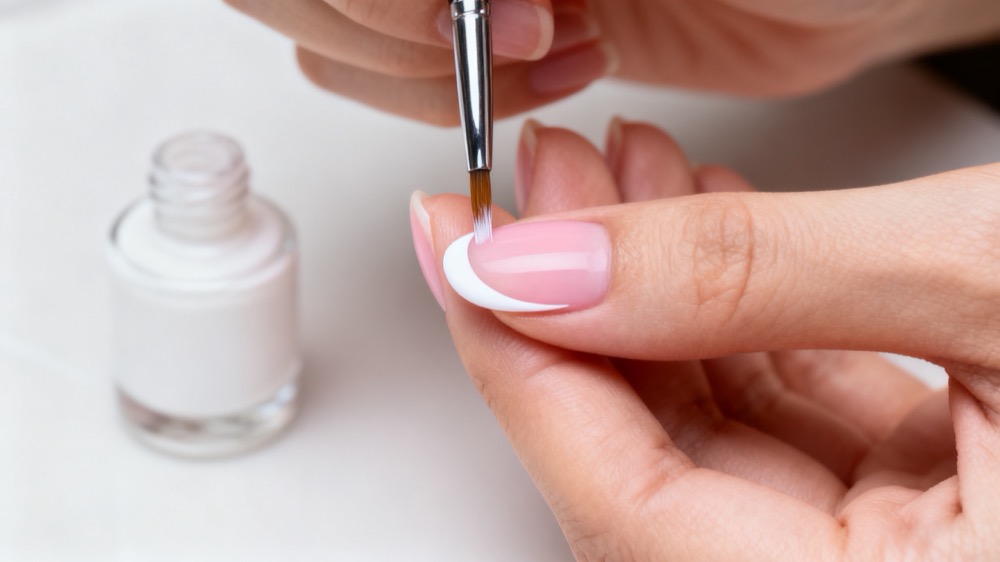
Check the curve from above.
For regular polish, use a small cleanup brush with minimal remover to refine mistakes carefully. Too much remover can disturb the base color.
For gel, keep uncured product away from skin and follow the system's cleanup instructions before curing. If gel repeatedly floods the surrounding skin, stop and seek professional guidance.
Do not cure a messy layer simply to finish faster.
Once the tip layer has dried or cured as directed, apply a compatible top coat.
Cover the design evenly without flooding the sidewalls. Seal the free edge only as recommended for the product and nail length.
Inspect all ten nails together. Look for balanced proportions, smooth coverage, and clean surrounding skin.
Apply moisturizer or cuticle oil afterward, once the manicure process is complete.
A successful oval French manicure is not a single template.
A narrow white band preserves more visible base color.
If the natural white edge is uneven, a slightly more opaque base may help create a consistent background.
Avoid making the band wider just to hide every irregularity. That can overwhelm a short nail.
Medium lengths allow more flexibility.
Try a softly curved tip first, then adjust the depth if you want a more dramatic look.
Compare the thumb and little finger carefully. Their different widths mean identical measurements may not create an identical visual effect.
Longer nails provide room for deeper smile lines, colored tips, or a double French design.
However, extra length does not require a thick white band.
Check the finished nails from the side as well as above. Excess product at the tip can create a bulky profile.
| Problem | Likely cause | Practical adjustment |
|---|---|---|
| Uneven smile line | Too much product or an unstable hand | Use smaller strokes and support your working hand |
| Thick, bulky tip | Trying to achieve full coverage immediately | Apply thinner layers within the product's instructions |
| White band looks heavy | Tip width overwhelms the nail length | Narrow the band and preserve more base color |
| Crooked appearance | Uneven shaping or unbalanced side points | Check the outline before repainting |
| Smudged regular polish | Layers were disturbed before drying | Allow sufficient drying time |
| Product on surrounding skin | Overloaded brush or poor positioning | Reduce product and correct contact promptly |
Fix the underlying problem rather than repeatedly adding polish. More product rarely makes an uneven curve easier to control.
Hand painting is not the only route to French tip oval nails.
French nail stickers can help users who find freehand curves difficult. However, distinguish decorative stickers from temporary painting guides and gel nail strips. Their application and removal requirements differ.
For temporary guides, make sure the underlying polish is sufficiently dry before placement. Follow the guide manufacturer's instructions for removal.
Finished oval French press-on nails provide a predesigned alternative.
Before applying them:
- Match each tip to the natural nail's width and curvature.
- Avoid forcing a narrow tip over a wider nail.
- Use the supplied adhesive according to its instructions.
- Keep adhesive away from skin.
- Follow the specified removal method instead of pulling tips off.
Neither press-ons nor stickers should be described as automatically damage-free. Product choice, application, wear, and removal all matter.
For brands, wholesalers, and retail buyers, an attractive sample is only the beginning.
A French design must remain visually consistent across a size range while fitting different nail widths and curves.
An effective development brief should define:
- Oval outline and target length.
- Base shade and opacity.
- Tip color.
- Smile-line depth and band width.
- Surface finish.
- Size assortment and packaging.
Do not approve only the medium-size sample. Compare the smallest and largest tips too.
The goal is a coordinated collection, not simply the same artwork enlarged or reduced.
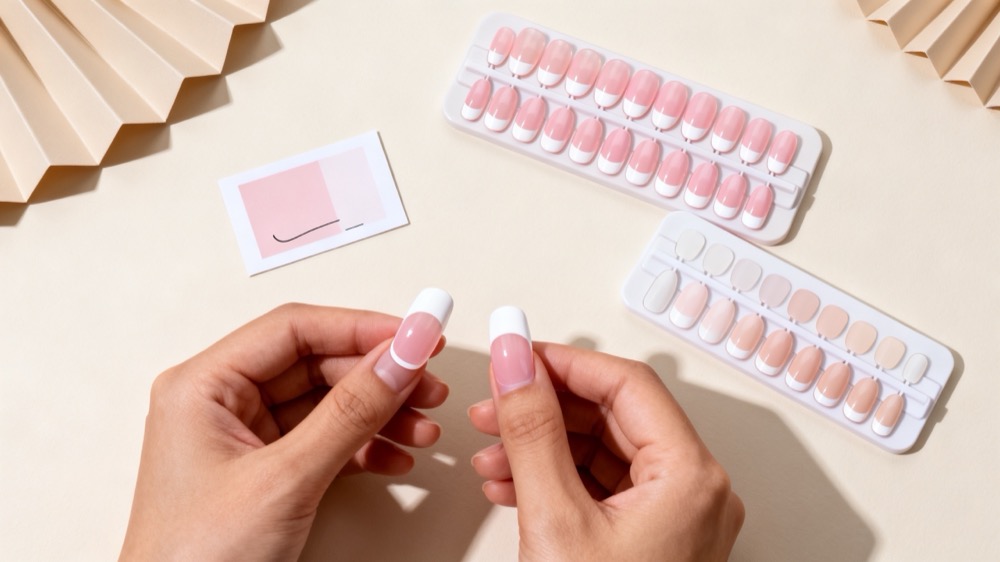
A useful sample review includes:
1. Comparing the full size range under consistent lighting.
2. Checking tip edges and surface finish.
3. Assessing fit on the intended range of nail shapes.
4. Reviewing adhesive instructions and removal guidance.
5. Recording revisions against an approved reference sample.
These are recommended development checkpoints, not claims that every supplier follows an identical process.
Dongguan YoungMei Technology Co., Ltd. brings more than 15 years of experience in nail product development and manufacturing. With its own factory and established supply chain, the company supports global brands, wholesalers, and chain retailers with OEM/ODM customization, rapid sampling, consistent-quality production, and one-stop sourcing.
Specific materials, testing requirements, lead times, and acceptance criteria should be confirmed for each project.
A polished finish should never take priority over discomfort or a skin reaction.
Avoid contact between uncured gel and skin. Follow all product warnings, and never improvise curing times.
For lamp-cured manicures, dermatologists recommend protecting the hands with broad-spectrum, water-resistant SPF 30 or higher sunscreen or dark, opaque fingerless protective gloves.
Do not pick, scrape, or forcibly peel away a manicure. Removal methods vary by product, so identify the system before starting.
Stop using a product if itching, swelling, blistering, or other irritation develops. Seek medical advice for persistent reactions or unusual nail changes.
A refined oval French manicure combines shape, proportion, controlled application, and appropriate product care.
For brands developing a coordinated range, those same principles should guide sampling and approval.
Send Dongguan YoungMei Technology Co., Ltd. your target nail shape, preferred lengths, base shades, French tip references, packaging requirements, and estimated order quantity. Request an OEM/ODM sample proposal to review design options, fit, finish, and project-specific production requirements before placing your order.
Yes. Use a narrow tip and a shallow curve. If there is little free edge, prioritize a balanced rounded outline rather than trying to create extra length through filing.
Regular polish with a fine brush is a practical starting point. Guides can help define the curve, while finished press-ons avoid hand painting. The easiest option depends on your brush control and preferred application method.
Not necessarily. Nails differ in width and length. Aim for consistent visual proportions rather than an identical band measurement on every finger.
Only when the products are intended to work together. Decorative stickers, painting guides, and gel strips are different products. Follow their compatibility and application instructions.
There is no reliable universal wear time. The product system, preparation, fit, application, daily activities, and removal habits all affect performance. Use the manufacturer's stated guidance rather than assuming a fixed duration.
Check the nail shape first, then compare the smile-line side points and tip proportions. An uneven outline or an overly wide band can make the manicure look unbalanced even when the white polish is smooth.
1. Paola Ponce. ["How To French Tip Nails On Oval Nails Like A Pro."] Original topic reference for oval French manicures and specialist tools. The accessible text does not provide a complete standalone procedure or visible user comments. The article above is an independently structured guide, not a reproduction of the original tutorial. [paolaponcenails]
2. American Academy of Dermatology Association. ["Gel manicures: Tips for healthy nails."] Supports guidance on hand protection during lamp-cured manicures, avoiding picking, and caring for nails between applications. [aad]
3. American Academy of Dermatology Association. ["Artificial nails: Dermatologists' tips for reducing nail damage."] Supports cautions concerning excessive filing, cuticle trimming, and covering damaged nails. Its acrylic-specific observations should not be interpreted as direct performance evidence for every press-on product. [aad]
4. American Academy of Dermatology Association. ["Manicure and pedicure safety."] Supports recommendations on moisturizing, recognizing adverse reactions, and avoiding artificial nails over existing nail problems. [aad]
5. U.S. Food and Drug Administration. ["Nail Care Products."] Supports following labeled instructions, providing ventilation, avoiding skin contact with relevant nail chemicals, and recognizing irritation and allergy risks. [fda]
6. American Academy of Dermatology Association. ["Dermatologist's secret for removing gel nail polish at home."] Supports the warning against picking, scraping, or forcibly removing gel polish. Product-specific removal instructions remain necessary. [aad]